Typically, we think of July as Summertime in Britain. Hampton Court Flower Show, Wimbledon and The Proms all feature this month and are markers of a British Summer. Then picture the quintessentially British Summer Garden and I bet you see beds of jumbled up Cottage Garden favourites, jostling with each other for space and competing with their colour!
Actually, July in the garden can be somewhat different! It’s a bit of a green month; sometimes providing a bit of a lull between the fresh greens and colours of Spring and the more intense colours that come with those plants flowering in late Summer. So, if you’re feeling a bit jaded in this heat and your garden is too here are some ideas for planting to pick you up in this July gap!
Lavender – the colour seems more intense than usual this month and I wonder if the dry weather is helping to lock in the colour and scent! It typically likes dry conditions, not liking heavy clay soils and the potential for soggy roots! Shear off the flowers after they have flowered and then shear again in the Spring to keep the bushes compact as they are prone to getting leggy and woody.
Hibiscus – the flowers on Hibiscus look so tropical but love the conditions in Britain. It’s just getting going in July and will last into the Autumn. Prefers a well-drained soil too and a hard prune in Spring.
Roses – Is it just me or have they been spectacular this year? Whatever your favourite colour or scent you will find a Rose for you. Just keep deadheading or picking them and they will flower for you all Summer long, if not year long! Prune them over the Winter, removing anything that is dead, damaged or diseased and a 3rd of stems and they will thrive and flower for you.
Allium Sphaerocephalon – is the later flowering Allium and was all over the Flower Shows this year. It’s a dark purple and tear dropped shaped and looks great planted through a border. Remember to plant in groups of odd numbers for bigger visual impact but a great plant that even when the flowers have faded will leave a striking seedhead for you to enjoy for the rest of the year.
Yarrow (Achillea) can be spotted at this time if year with it’s flat topped umbels and feathery light green foliage. It comes in a variety of colours, prefers well-drained soils but again gives you striking seedheads when the flowers have faded. All you need to do is cut them down when they look too scruffy and wait for the flowers again next year.
The Butterfly Bush (Buddleia) is tough as old boots! But produces the most beautiful flowers and (as its name suggests) the bees and the butterflies love it! Cut it down every Spring so it doesn’t get out of hand and it will reward with you flowers and scent!
Just a few ideas to bring some colour to July. Let me know what your favourites are.
I’ve just read this article about a community in London crowdfunding for a Community Gardener. The appeal builds on the 10xGreener project, which has seen a BBC TV crew following the local community’s attempts to make a single street, Daubeney Road, ten times greener.
They have realised to keep the impetus going they need some consistent help and expertise and so are looking for a gardener 1 day a week to maintain some of the projects that have been created, offer advice to residents and continue making and planting.
There is so much about this project that makes me glow: community and connection through gardening and planting.
But what it highlights though is that when you start something you often have to maintain it, and gardens and gardening is no different. I know that I get so excited by planting new plants, sowing seeds, making a hanging basket but that the nurturing of them, the care of them and the maintenance of them can sometimes feel overwhelming in the busy rush of life! And that the joy and excitement of starting the thing can quickly swing the other way when I’m disappointed in myself for not looking after something and seeing it literally shrivel up and die!
Don’t beat yourself up! Do what you can and most importantly enjoy what you can! Here’s some top tips to make gardening a bit easier:
Approach your space in chunks and do a chunk at a time. If your pots need watering and weeding do the watering today and the weeding tomorrow.
Weeding can feel overwhelming – use a hoe on a hot day to sever the small weeds from their roots – they will die in the warm weather on the top of the soil and you don’t have to collect them up – easier on the back and quicker to complete
Watering – water less often but for longer. Only new plants, seeds and pots and containers should need watering. Established plants in the ground should look after themselves unless we have a severe drought. Water your pots 2-3 times a week but make sure they get a good drink rather than just a splash every day
Leave you watering can outside so it can fill with rainwater and is close to hand to use
Don’t beat yourself up – it’s only you that knows what you haven’t done, or got round to!
Gardening can feel like a chore, but hopefully these tips can ensure you spend some time in your outdoor space enjoying it!
I’m very excited! They are remaking ‘The Secret Garden’ which is 1 of my very favourite books. Its not to be mixed up with ‘Secret Garden‘ which is being released this year and which is about an entirely different topic!! Its going to star Colin Firth and Julie Waters and I can’t wait to find out where they are filming it!
It got me thinking about our own gardens and how sometimes we want some secret space from the family but also private space from our neighbours. So what makes up a Secret Garden:
Paths – that twist or turn or that has planting either side to create a path that runs through greenery. What you don’t want is to see where the path goes. You want it to draw you in to find out where it goes.
A destination – the path needs to take you somewhere – it could be to a seating area, a focal point or to the shed! But the point is you can’t see the destination when you start out!
A canopy to cover and create a ‘room’. This could be created with trees providing a natural canopy of leaves or it could be made by an arbour or pergola covered in climbers.
A garden gate – nothing more secret than to have to open a gate to go through to the next space. It could be a wrought iron gate you can see through, or a panelled wooden one you have to open to see through!
Exuberant planting – that gives you a glimpse through to what is beyond. Think of height and movement; to screen the background and colour and scent to stop you on your way.
Light and dark – there might be distinct areas so that you pass from shady paths into a sunny courtyard, but the light and temperature change ensures that all your senses feel the change as you explore further.
Organised chaos – for me a secret garden is a bit unkempt! A bit overgrown and mossy at the edges!
Lights – the fabulous fairy lights that are available now are just the thing to be strung up in the trees, shrubs and canopy to let you use your secret garden in the evening when the fairies come out to play!!!
So having caught up with all the coverage from Chelsea here are my thoughts on what we can take away from the Show to use in our gardens:
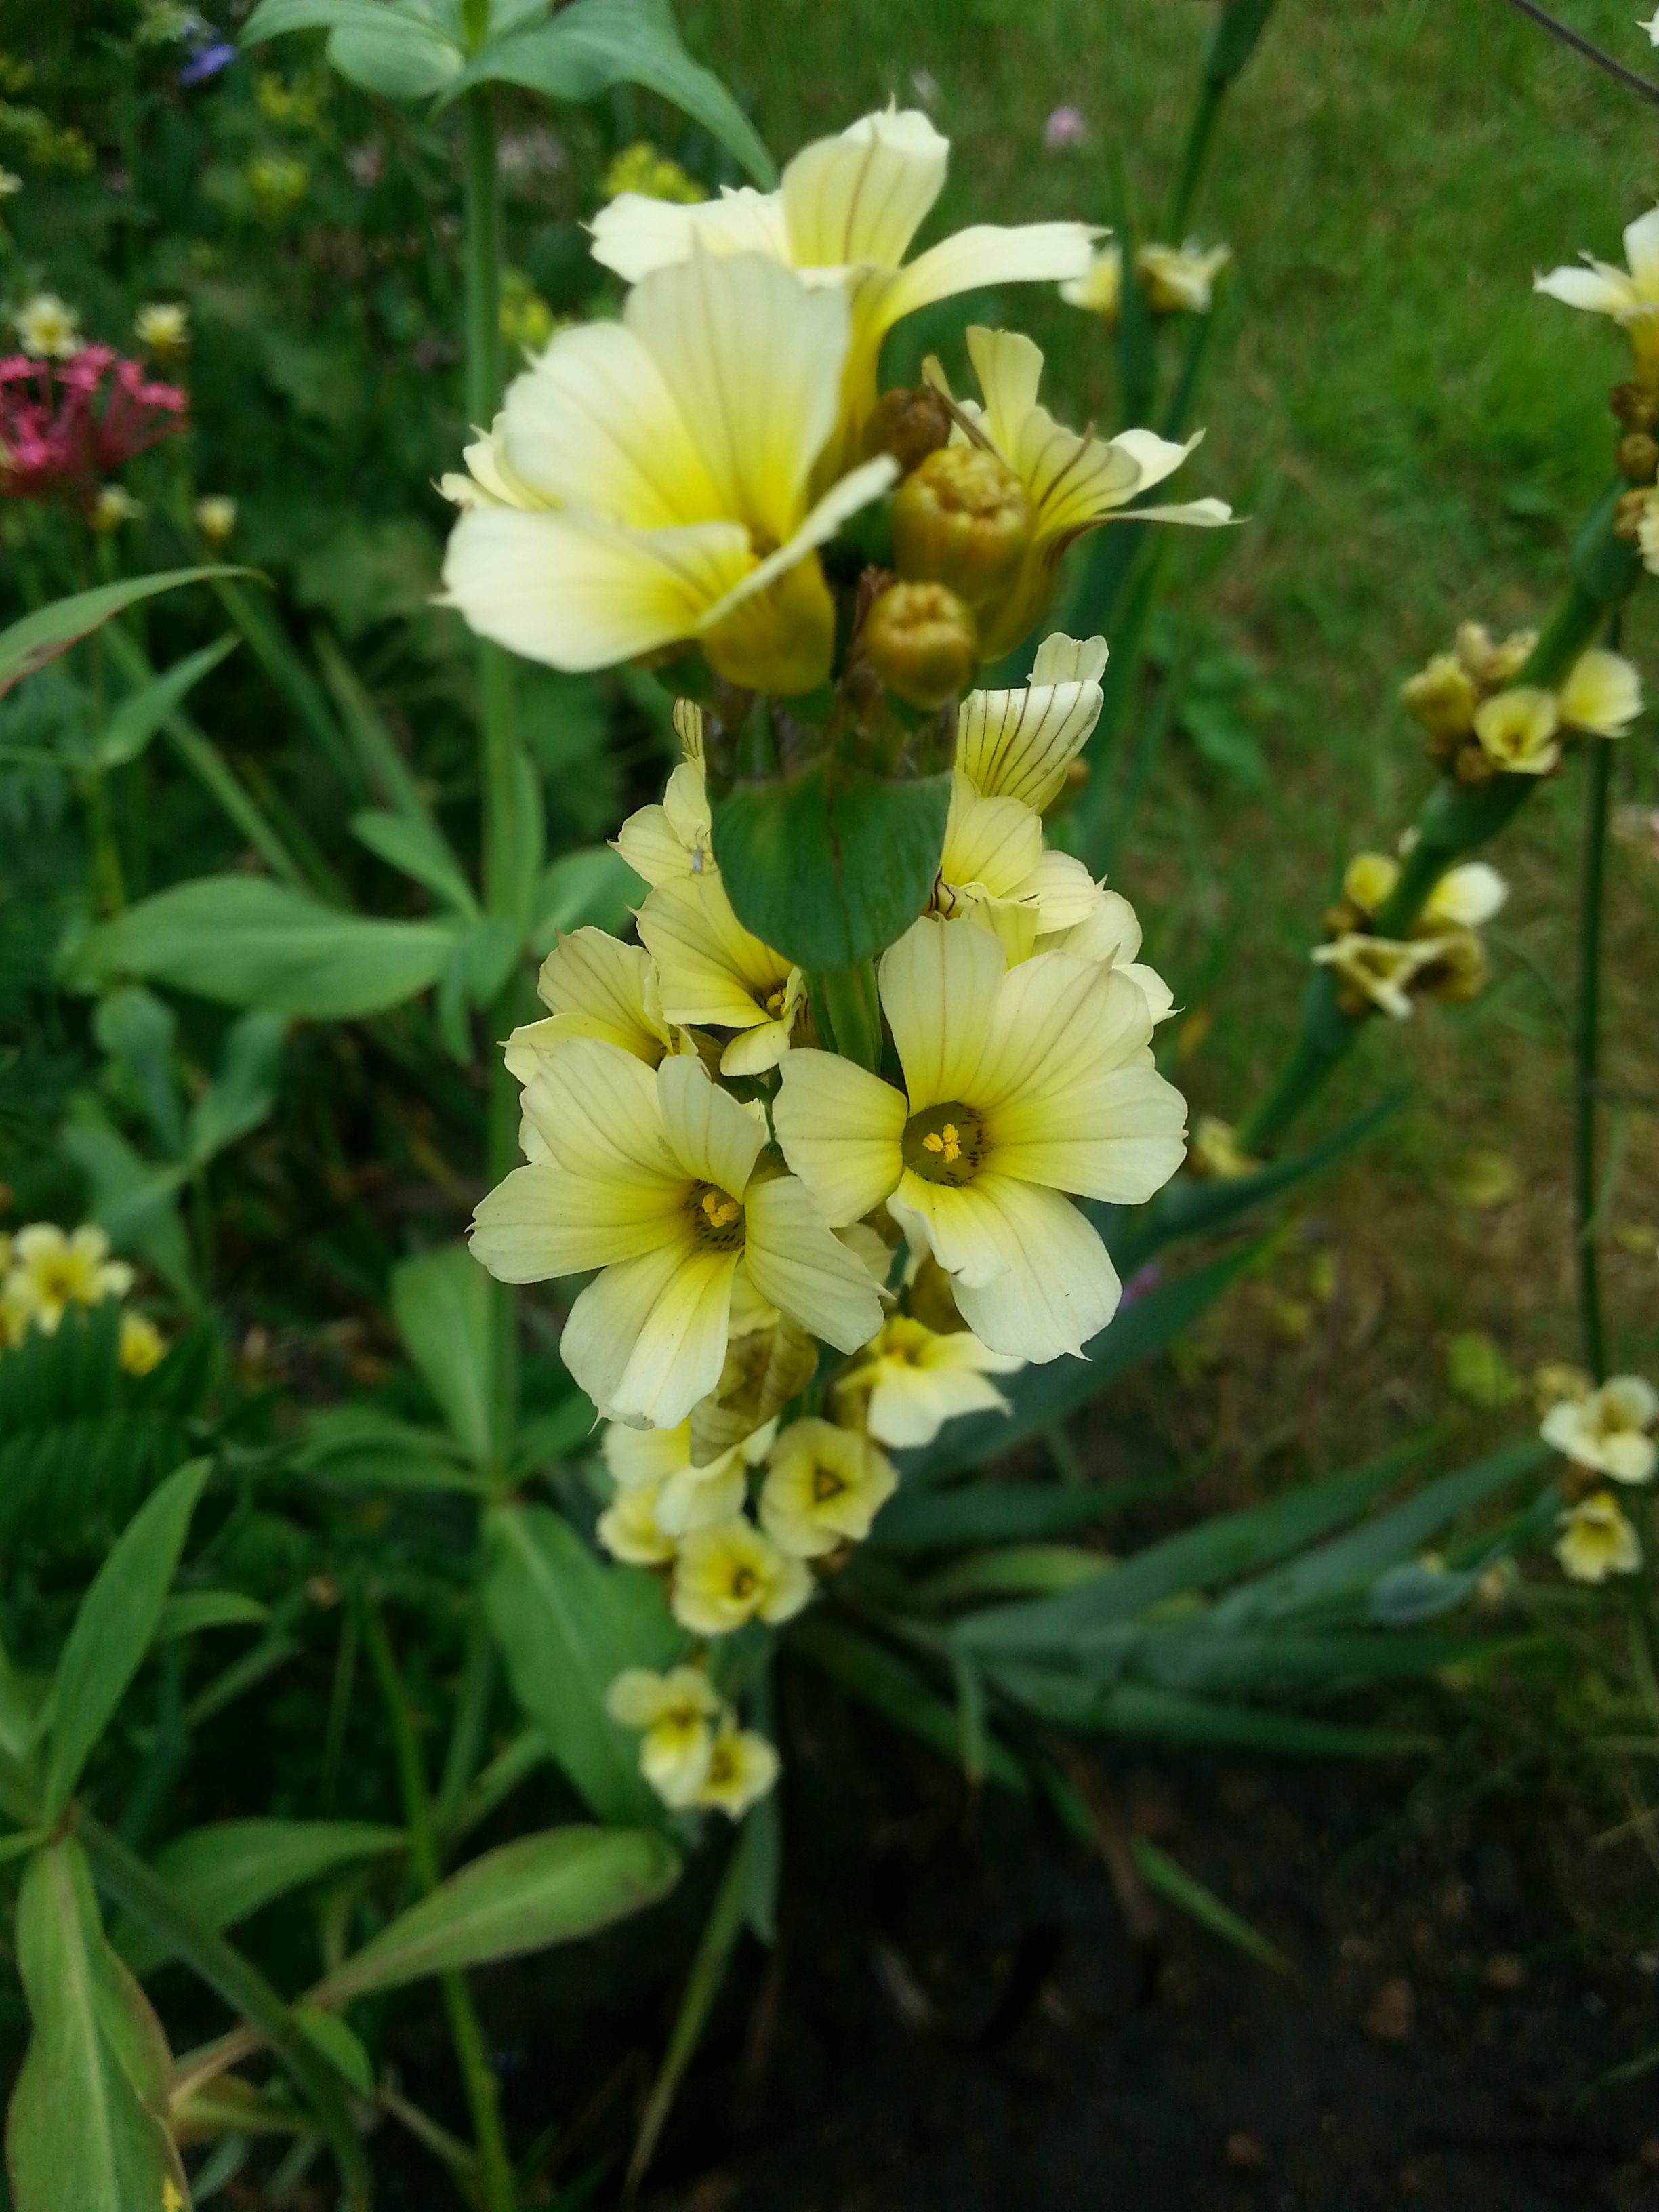
Yellow seems to have been a really popular accent colour with yellow Globeflowers (Troillus), Ladies Bonnets (Aquilegia), Woad, Hot Pokers (Kniphofia) and Lupins appearing in lots of the show gardens. And we’re not talking pastel Yellow here we’re talking bold and dramatic hues of Yellow bringing sparks of brightness to the foliage. All of these plants can be used in our gardens and I would add Sneezeweed (Helenium) and Aunt May (Sisyrinchium striatum) (pictured) to the Yellow Hit List!
Plants with vertical spires of flowers also seemed to crop up all over the place with Foxgloves (Digitalis), Mullein (Verbascum), Foxtail Lilies (Eremurus robustus) and especially Lupins making bold statements throughout the show gardens. We can definitely use these in our gardens, I would clump then together in odd numbers to make more impact and add Turkish Sage (Phlomis russeliana) and Bears Breeches (Acanthus mollis) to a list of high performing Flower Spires!
Corten Steel – we seem to have fallen in love with the coppery tones of corten steel and its been used in lots of differentways: planters, pots, water bowls, edging and pergolas. It’s definitely a modern material that we can use our gardens that melds with other materials and styles, whether traditional or more modern and is easy on the eye in its simplicity and sleekness. I especially like these Light Fittings by Nordlux at Wayfair.
So yes they are Show Gardens that sometimes cost more than my house is worth but I very much see them as the Couture Shows in fashion; they’re exciting and innovative and always provide inspiration for even the smallest of spaces!
There is cheap and easy way to get some colour this Summer in your garden by sowing seeds indoors this February – April. All they need is soil, water and warmth to get growing and there is a huge selection of flowers that you can choose from.
These seeds can be bought from the Garden Centre, or on the High Street from supermarkets, Wilkinsons or Robert Dyas. Pick what colours you like – don’t worry about what might go together just pick what you like the look of. This year I’ve chosen favourites such as Poppies, Cosmos and Sweet Peasand Sunflowers but added Bergamot, Rudbeckia and Clary to try this year. All you need to get going is:
Seed compost
Potting Compost (the normal stuff you would buy for pots)
20cm wide pots that are 20cm tall with drainage holes, seed trays or cardboard toilet rolls for the Sweetpeas
Clear plastic bottles to cover (acting like a greenhouse), clear polythene or glass
Pencil
Fill the pot or tray with seed compost, shake then firm down the soil. If the seeds are tiny sprinkle them across the surface of the pot or tray and then cover lightly with a fine layer of compost and firm gently again. For Sunflowers or Sweetpeas use the pencil to make a hole in the soil about 3cm deep, drop your seed in and then using the pencil cover it up with the compost. A 20cm pot can take 3-5 seeds and a toilet roll can take 2 seeds. The seeds should be about 2cm apart.
Label your pot or tray and then water. Keep the soil damp throughout, not soggy or boggy though!
Take a clear plastic bottle and cut in half. You then have 2 halves you can put on top of your pot to act as a mini-greenhouse. Clear plastic bags or glass works just as well over pots or over trays (you can buy plastic lids for seed trays to turn them into proper looking greenhouses!) Keep your seeds in a light place but not in direct sunlight.
Within 2 weeks you should see green stems appearing. Once you do remove the plastic or glass.
When your seedlings are big enough to handle (with 3-5 sets of leaves) carefully tease them out of the pot or tray with a pencil and transplant them into bigger pots or trays of potting compost 5cm apart. Keep them indoors or in a greenhouse until the frosts have passed in May. 1 week before planting move the seedlings to a sheltered spot outside to get them used to the outside temperature.
Just have a go – it’s dead easy, kids love sowing seeds too and they begin to appear pretty quickly so it feels like they are growing in front of your eyes! If you have any questions just leave them below or share with me your seeds growing!
They are hard to resist when you see them piled high in the Supermarket but so many times they have wilted and died before Christmas Day and you’ve been left wondering what you did wrong! Here’s some tips to keep your Poinsettia blooming until Christmas is over:
When you buy choose plants from a loving environment! They hate the cold and draughts so if you find them in your local supermarket by the automatic doors I would avoid them! Also make sure the pot is well wrapped in plastic or paper to take it home!
Once home place them in a bright position but not in a draught or in direct sunlight, windowsills are often too cold and avoid porches or by doors. Changes in temperature is often a houseplants worst enemy, especially in Winter as we whack the heating up during the day so don’t place your Poinsettia on top of a radiator either.
Don’t over-water or let it dry out completely. Feel the compost and only water when it is beginning to dry out. They quite like a bit of humidity but avoid spraying or misting the leaves. You can achieve this by sitting the pot on a tray of pebbles or gravel that is covered in water.
They are beautiful and most people throw them away after Christmas but you can get them to bloom again in their 2nd year with this advice from The RHS:
Prune back the plants hard in April, to about 10cm
Repot them, growing them in a light, cool place over summer
Flowering and bract colouring is initiated by short winter day-length, occurring naturally in December and January. So from November onwards, plants should be put in a dark room after twelve hours of daylight and protected from artificial light sources
Plants need a constant temperature of around 18°C (55°F) to colour up well, so make sure they do not get too cold
Did You know?
Poinsettias are from Mexico
The red or coloured parts of the plants are often thought to be flowers but are actually bracts or modified leaves
The sap of the Poinsettia is toxic but not deadly
The plant’s association with Christmas began in 16th-century Mexico, where legend tells of a girl who was too poor to provide a gift for the celebration of Jesus’ birthday and was inspired by an angel to gather weeds from the roadside and place them in front of the church altar. Crimson blossoms sprouted from the weeds and became Poinsettias.


 So having caught up with all the coverage from Chelsea here are my thoughts on what we can take away from the Show to use in our gardens: